Your Idea Deserves an App: A Modern React Native Starter Guide
Have you ever say to your self “I wish there is application that exist to solve this problem the way I want it to.” well you could do it in primarily two ways, either hire a developer(s) which is expensive and you don’t learn or you create it your self so you could learn but have frequent headaches in return. Well I prefer the latter and start creating my on applications.
Setting up your development environment can be a hassle sometimes, peer dependency issues, documentation command that just give build errors. Well today I will be guiding you with the proven steps that is tested to work and kick start your React Native journey!
Prerequisites
- Expo Go installed on a physical device
- Node.js (v22.x or higher)
- Code Editor (VS Code recommended)
Initialization of Expo App
For creating project there are templates available in expo documentation with that you could check out here as well as in examples that you could browse to check the template you will be using on your project. Since we will be creating our project from scratch we will be using the blank template and install everything by our selves and start by opening our VS Code, on the top left corner click File > open folder select the folder that you want your project to be placed or click the Open folder on the VS Code welcome screen. Open a terminal in VS code by clicking the 3 dots on the top and click new terminal or press ctrl + ` and run the command below in your terminal.
npx create-expo-app@latest Myapp --template blank-typescript
cd Myapp
After running this command you should see a new folder is created named Myapp and upon opening we could see starter files that is automatically created for our project
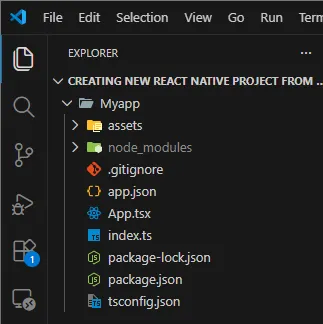
To test our our app run this code in the terminal and ensure that you are in the project directory when running this command.
# Start the development server
npm run start
You should see a QR code on your terminal just like this image below. Before you scan ensure that your laptop and your phone is within the same network other wise the Expo go app will not connect to the development server.
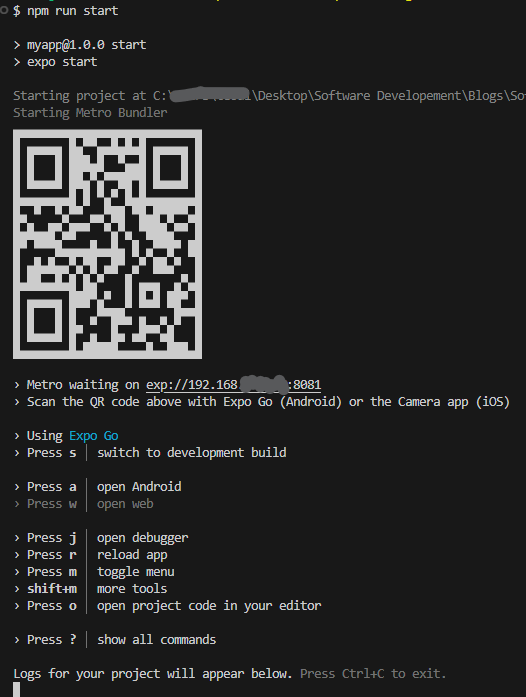
If you prefer to just watch the steps here is the video of the process I take for Expo app initialization.
Great! our React native application is working. Now we can proceed in the installation of Nativewind a utility-first workflow just like Tailwind CSS but for react native applications.
Setting up Nativewind
To install Nativewind and make it work we also need to install its peer dependencies but we will be installing it separately to avoid peer dependency issues.
npm install nativewindTailwindcss, react-native-reanimated and react-native-safe-area-context and worklets are the peer dependencies of Nativewind. At the time of writing this blog December 20, 2025, Reanimated is now in version 4.x but in the installation guide of Nativewind react-native-reanimated@~3.17.4 they use so for now we can just install the latest available package that is compatible with expo. It is important to use npx expo install to insure that the packages is compatible with expo and avoid issues like the image below.
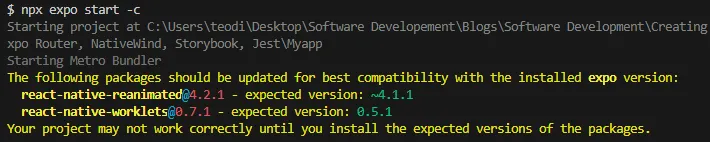
Nativewind Dependencies
Next, let's install the dependencies that is expo compliant by running the command below.
npx expo install react-native-reanimated react-native-worklets react-native-safe-area-contextWe also need Dev dependencies like tailwindcss and prettier-plugin to install that we need during the development of our application.
npm install "tailwindcss@^3.4.17" "prettier-plugin-tailwindcss@^0.5.11" --save-devConfiguration Files
Before we could use Nativewind there are few configuration files that we need to create, those config files are babel.config.js, tailwind.config.js and metro.config.js.
Generate tailwind.config.js
Lets start with tailwind.config.js, We can create it manually or we could simply run npx tailwindcss init and the tailwind config file will be created the will have starter code just like on the image below.
npx tailwindcss init//* @type {import('tailwindcss').Config} */
module.exports = {
content: [],
theme: {
extend: {},
},
plugins: [],
}Tailwind.config.js contains the path where Nativewind will look for styles (JSX or TSX files) and monitor changes and convert the utility class into css classes so it is important to double check the paths listed in this file. If the path is not included, tailwind will ignore that path or file and utility classes or style will not apply to the component so initially there is no path listed. Copy and paste the code below and make sure that all files or path that needed to be style is in the contents object.
/** @type {import('tailwindcss').Config} */
module.exports = {
// NOTE: Update this to include the paths to all files that contain Nativewind classes.
content: ["./App.tsx", "./components/*/*.{js,jsx,ts,tsx}"],
presets: [ require("nativewind/preset") ],
theme: { extend: {},
 },
plugins: [],
}
Create global.css
Create a global.css by clicking the file Icon to the top or by right clicking on the projects folder in my case (Myapp) then click New file then name it global.css. Inside it copy and paste the code below.
@tailwind base;
@tailwind components;
@tailwind utilities;
Generate Babel.config.js
npx expo customizeNext we need to add babel presets in babel.config.js file we could create it manually or run npx expo customize and config file selection will show up and select by pressing space and enter to submit. Once created you should be able to see its content just like the image below.
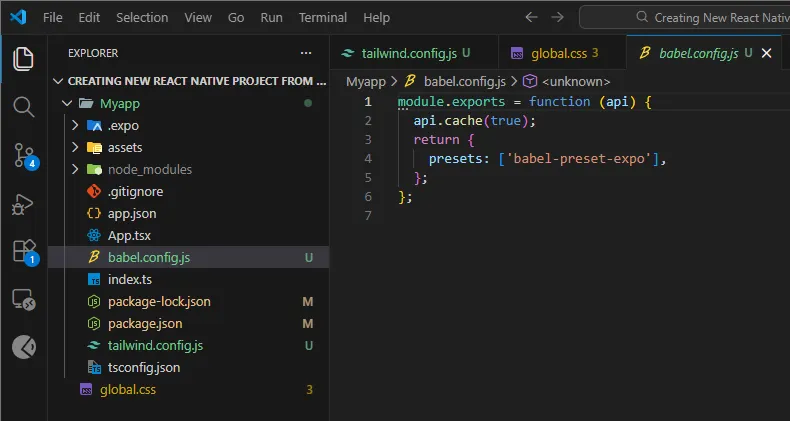
Replace the current content into code below:
module.exports = function (api) {
  api.cache(true);
  return {
    presets: [
      ["babel-preset-expo", { jsxImportSource: "nativewind" }],
      "nativewind/babel",
    ],
  };
};
Generate Metro.config.js
npx expo customizeLastly the metro.config.js file that tells the metro bundler on how to bundle our application, but since we have created .css (a extension that is not recognize by the bundler) we need to configure it inside our metro config file.
Just like in the Babel config file we could also generate metro.config.js by running npx expo customize and once created you should see the file content just like the image below.
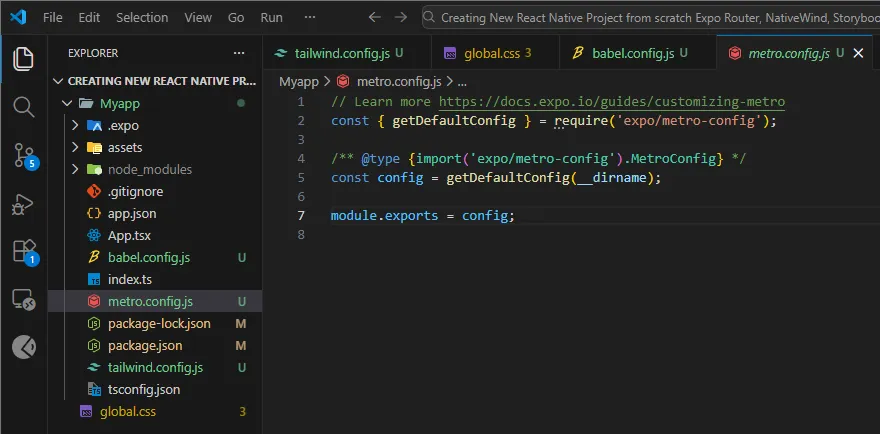
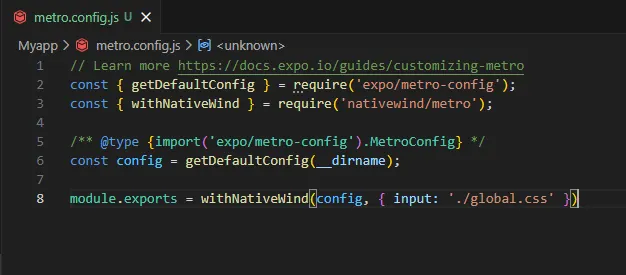
Update this file by adding this line const { withNativeWind } = require('nativewind/metro'); below the getDefaultConfig and replace module.exports = config into module.exports = withNativeWind(config, { input: './global.css' }). Your metro config file should be the same as the image below.
Import Global.css on Root folder
Now we need to export our global.css file into our root file so we could import this into our App.tsx
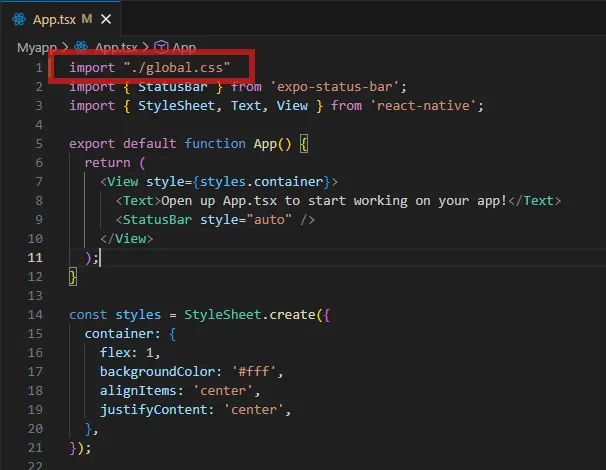
Lastly we can add TypeScript setup, a step that is optional as per the native wind documentation but if does not hurt we can just go ahead and do this step.
Create nativewind-env.d.ts
Create new file named nativewind-env.d.ts and paste below code as it is. If you cant copy and paste the name just type it out manually and inside it copy and paste this code below.
/// <reference types="nativewind/types" />Nativewind Testing
Finally, We could Test our application and see if Nativewind is working. We could do that by restarting our development server and add -c flag to clear the cache of the previous build and build the application from scratch.
npx expo start -c