[ Tutorial ]
How to Blink an LED with Orange Pi: A Beginner's Guide


Introduction
Blinking an LED with an Orange Pi might seem like a small step in the world of electronics, but it's a giant leap for beginners. In this step-by-step guide, we'll take you through the process of controlling an LED using an Orange Pi. Whether you're an aspiring electronics enthusiast or just curious about how things work, this project will ignite your passion for learning. So, let's dive in!
Prerequisites
Orange Pi: Setting up your orange pi that we covered last post
LED: Any basic LED will do.
220-ohm Resistor: This resistor will protect the LED from too much current
Breadboard and Jumper Wires: For easy connections
Power Supply: Ensure your Orange Pi is powered up.
Step 1: Installing OPi.GPIO
This python module is what will be using to interface with the hardware of Opi. To install it copy and paste command below.
sudo pip3 install Opi.Gpio
You should see below output once successfully installed.
teodi@Oh-my-Opi-one:~$ sudo pip3 install OPi.GPIO
Collecting Opi.Gpio
Using cached OPi.GPIO-0.5.2-py2.py3-none-any.whl (33 kB)
Installing collected packages: Opi.Gpio
Successfully installed Opi.Gpio-0.5.2
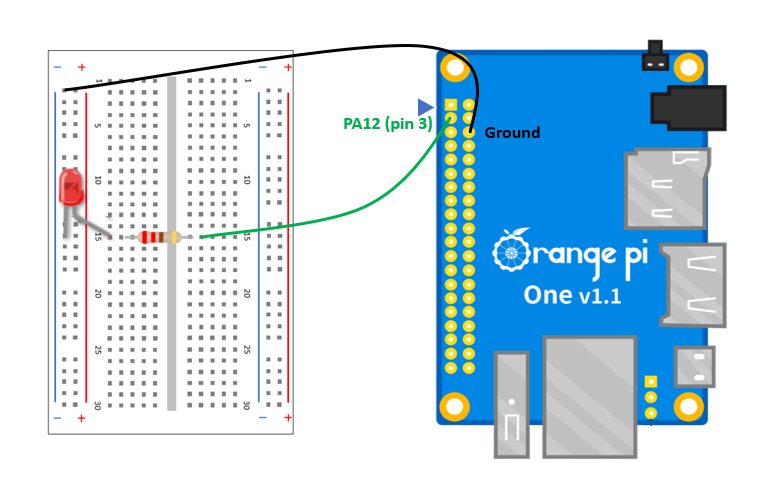
Step 2: Wiring the LED
I will assume you know how breadboard works if you landed in this page but if not you can go to this tutorial that goes indepth on how breadboard works and how to use it.
Step 3: Writing Code
Open you putty and connect to your Orange Pi like be have covered in the last blog post once login go ahead and create our python file that will contain our code, to do that run below command.
touch Blink.py
Once created make sure to make the python file executable to avoid getting permission error since we will be interating with the gpio which needs a root access.
chmod +x Blink.py
After you have done that we can now go ahead and edit the code.
Open the file by using nano or vim, if you are new to command line I recommend starting up with nano, just run
command below.
nano Blink.py
Once the file is open go ahead and copy and paste below code.
# Import the modules that we will be using
import OPi.GPIO as GPIO
from time import sleep
# Set the GPIO mode to physical board numbering
GPIO.setmode(GPIO.BOARD)
# Assign pin with its using physical location
ledpin = 3 # PA12
# Set the LED pin as an output
GPIO.setup(ledpin, GPIO.OUT)
# set the duration of the delay into half a second
delay = 0.5
# for loop that will run what is inside for 10 times
for i in range(10):
GPIO.output(ledpin, GPIO.HIGH) # This will make the led turn
on
print("Turned HIGH")
sleep(delay) # stay on for given amount of time
(delay)
GPIO.output(ledpin, GPIO.LOW) # This will make the &led turn
off
print("Turned LOW")
sleep(delay) # stay off for given amount of delay time
# Clean the resource that has been used
GPIO.cleanup()
print("Completed!!")
After pasting the code press CTRL + o to save it and press CTRL + x to exit
Step 4: Run the Code
Finally we are now ready to run our python script and to do that run the below command and input your password once promted.
sudo python3 Blink.py
If all goes to plan you should see the led turn on and off. If its not working double check your connection with the orange pi pins.
Conclussion
In this post we have learn to control the gpio pins of our orange pi which is very useful especially on alot of aplication like IoT, home automation, hobby projects and more.